How to Choose a
Compound Bow
By Larry McCoy |
Compound bows come with a lot of advantages: they provide more power and speed, and assist the archer in taking aim for longer periods without strain. The trade-off for this is a more complicated bow than your Robin Hood-style longbow or its modernized counterpart, the recurve bow.
When I’m choosing a compound bow, I move step-by-step through its most important components: eye dominance, draw length, draw weight, axle to axle length, let-off, speed, noise, brace height, overall weight, cams, risers, and price.
This guide will help you understand what these elements are and how to prioritize them so that you can choose the compound bow that’s best for you.
What is a compound bow?
First, let’s ensure we have the same definition of a compound bow and its most important working parts. A compound bow is a modern invention, using a complex system of cables, pulleys, and cams to lighten the archer’s burden while increasing power on the arrow.
Compound bows release arrows with more speed, but they also create more opportunity for the archer to aim without straining. The pulley system helps the archer to hold the draw for longer, as most bows have a “valley” where 60-90% of the draw weight drops off.
The main elements of a compound bow are:
- Riser, or main part of the bow.
- Bowstring, the actual string of the bow.
- Limbs, which store draw energy.
- Cams, which rotate during the draw.
- Cables, an assembly of cables and strings keeps everything moving across the bow.

Compound bows are usually a better choice for intermediate to experienced archers who can work with the more complex design.
Uses of a compound bow
The right compound bow will depend on your intended uses. If you’re hunting, you need a bow that is strong enough to take down your target game, and provide the quietness and stealth you need while hunting at shorter distances than riflemen are used to. Make sure to check the draw weight and let-off for power, as well as the cam system for unexpected noise. Hunters will also need sights for various distances.
If you’re primarily interested in a bow for target practice or recreational shooting, that’s a different story. Here, the priority is about the bow’s accuracy, while the power and noisiness won’t be as important. Your draw length and weight will be important here in helping you find a bow that gives you more control over your shot.
Now let’s get into the steps you should take to find the compound bow that’s right for you.
Step 1: Determine your eye dominance
Just like you have a dominant hand, you also have a dominant eye: one eye that works just a bit better than the other one. Your first step when choosing a bow is to make sure you’re favoring your stronger eye.
If you already know your dominant eye, great! If not, you can determine it fairly easily.
Determining your dominant eye
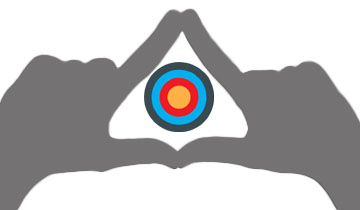
- Stretch your arms out in front of you and form a triangle between your forefingers and thumbs.
- With both eyes open, focus on something in the middle of the triangle, like a wall decoration or piece of furniture.
- Close one eye, then open it. Close the other eye, then open it.
- Closing one of your eyes will “move” the object more than the other. The eye that does NOT experience this “move” is your dominant eye.
If your right eye is dominant, we suggest you shoot right-handed. If your left eye is dominant, we suggest you shoot left-handed.
Step 2: Find your draw length
Now that we know whether we’re looking for righty or lefty bows, we need to know the ideal size for you. Draw length is related to the length of your arms: if it’s too short, you’ll end up with too much torque; if it’s too long, you won’t be able to keep your shooting stance while seeing through your sights. These are major issues that can greatly impact your accuracy, consistency, and comfort.
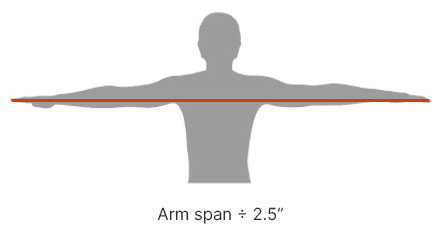
If you don’t know your draw length, you can head into your nearest Sportsman's Warehouse to get measured, or you can measure it yourself at home. The easiest way is to measure your wingspan.
- Stand upright with your back against a wall.
- Stretch your arms out to the side (like a T).
- Measure the distance (in inches) from the tip of one middle finger to the tip of the other.
- Divide your wingspan by 2.5. This is your draw length.
Here’s a quick reference table for what draw length different measurements will result in:
| Arm Span | Draw Length |
|---|---|
| 57"-59" | 22"-23" |
| 60"-62" | 23"-24" |
| 63"-65" | 24"-25" |
| 66"-68" | 25"-26" |
| 69"-71" | 26"-27" |
| 72"-74" | 27"-28" |
| 75"-77" | 28"-29" |
| 78"-80" | 29"-30" |
As you determine your draw length, you’ll also want to consider your anchor point. This is the part of the archer’s face where your draw hand will be positioned during a full draw. Your anchor points should be consistent.
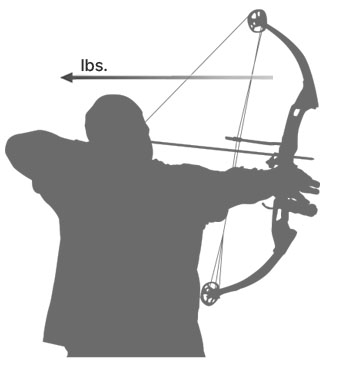
Step 3: Choose your draw weight
Draw weight refers to the maximum weight you will need to pull when drawing the bow. One of the special things about compound bows is that they have a let-off, which is not true of recurve or traditional bows. This means that just before reaching full draw, the pulleys will kick in and 60-90% of the weight will be released, giving you more time to aim without the strain of the full weight.
So how much draw weight is right for you? This depends on your purposes for shooting the bow as well as your personal capability. If you’re bowhunting, the draw weight impacts your ability to make a clean, ethical kill over longer distances, and many states have a minimum requirement of 40 lbs. However, if you have a smaller frame, increased draw weight may become difficult and reduce your accuracy (and enjoyment) when shooting the bow.
| Pros of More Draw Weight | Pros of Less Draw Weight |
|---|---|
|
|
Draw weight is adjustable on compound bows within a few pounds. Many archers will choose a bow just below their needs and then increase the weight, rather than reducing weight on a bow with a heavier draw. This is because most bows function best when they are close to their maximum weight rating.
Here are a few suggested draw weights based on size and stature. Keep in mind that your physical ability and strength will also play a role in determining the best draw weight for you.
| Body Type | Draw Weight |
|---|---|
| Child | 15-20 lbs. |
| Women | 30-40 lbs. |
| Average male | 55-65 lbs. |
| Larger males | 60-70 lbs. |
Your draw weight will also impact the types of game that you can target. Here are suggestions for draw weights that are most appropriate for a variety of game.
| Game Size | Draw Weight |
|---|---|
| Small game | < 25 ft/lbs |
| Medium game | 25-45 ft/lbs |
| Large game | 45-65 ft/lbs |
| Toughest game | < 65 ft/lbs |
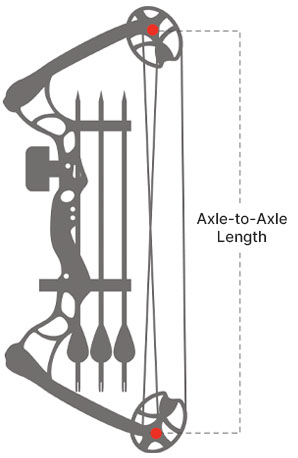
Step 4: Consider the axle-to-axle length
Have you ever looked at bows and wondered what that ATA figure means? ATA stands for axle-to-axle. The two axles of a compound bow connect the pulleys to the limbs, and ATA measures the distance between them.
The ATA determines your experience drawing the bow. A longer distance between them will make the whole system slow down, which means you’ll have to wait longer between your draw and your release, but the aiming process will be easier. If the axles are closer together, you’ll be able to fire more quickly, but you’ll have less control.
| <31 inches | Faster firing speeds |
| 31-34 inches | Middle ground |
| >34 inches | Slower firing speeds, easier aim |
Keep in mind that a longer ATA also creates a larger bow. A hunter trekking through the backcountry may not want that extra bulk, but it may not make much of a difference for a target shooter (or even a hunter who isn’t working through dense brush).
Step 5: Decide how much let-off you want
We’ve mentioned let-off before—the mechanism in the compound bow that allows 60-90% of the draw weight to drop off just before you fire. Not all bows have equal let-off, so it’s important to check what your bow is offering.
Let-off is expressed as a percentage, referring to the percentage of the draw weight that will be released close to release. A higher percentage will give you a bow that releases more of its draw weight. This happens in a specific “valley” close to your release point, and bows may have shallower valleys (where the release happens at a specific point) or deeper valleys (where you have more space with less draw weight).

A higher let-off is generally better, as it makes it easier for you to aim. Some archers do find that a draw can get “too light,” when they can’t hold the tension of the bow as well for their final draw and end up with a less accurate shot. This is a matter of personal preference that may take you some time to develop. A deeper valley is ideal so that you don’t have to hold the bow in as strict a position before the higher weight kicks back in.
| Pros of Higher Let-off | Cons of Higher Let-off |
|---|---|
|
|
Step 6: Find your speed
With several core components of your bow in place, now it’s time to check the speed you can expect your arrows to travel. A bow’s speed is measured in FPS, or the feet per second that your arrow is expected to travel.
Speed is a function of:
- The bow’s draw weight
- The strength of the archer
- The weight of the arrows (heavier arrows will fly more slowly)
- Conditions like weather and wind
Higher speed usually matters more for hunters, who want the increased power that speed often brings. You’ll often see FPS listed as a range on a bow, because of these other factors.
You may see the FPS followed by IBO or ATA. IBO means the FPS was calculated according to the standard of the International Bowhunting Organization, which calculates FPS with constant measurements of a 70-lb draw weight, 30-in draw length, and 350-grain arrow. ATA means the standards of the Archery Trade Association were used in the calculation. Comparing these two measurements isn’t quite apples to oranges, and make sure not to confuse this ATA with the axle-to-axle length!
Higher FPS doesn’t come with any downsides in itself, but you may see it on bows with a higher draw weight. Weigh the FPS you need alongside other factors that will help you shoot the bow well.
Step 7: Evaluate the bow’s noise
Recurve and longbows are very simple instruments, but a compound bow is a machine. This means it’s going to make some noise. If you’re target shooting, this may not be a huge issue, but if you are planning on using your bow for hunting, every snap, crackle, and pop counts.
Here are a few things to keep in mind when evaluating your bow’s noisiness level:
- Welded joints will make less sound, while more moving parts will create more sounds.
- Check the cams: the better synced they are, the quieter they should be.
You can also get accessories that will help reduce noise. Consider limb dampeners to reduce sound from the bow and rubber string dampeners to reduce sound from the string. You can also add a string stopper, which will stop the string moving more quickly after you fire
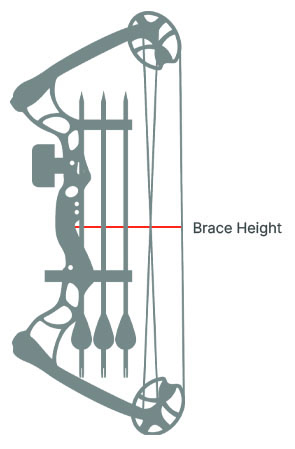
Step 8: Choose your brace height
When your bow is at rest, the brace height describes the distance between the string and the bow grip. The brace height relates to both speed and stability.
| Lower brace height (<6”) | Faster shot, less stability |
| Medium brace height (6-8”) | Middle ground |
| Higher brace height (>8”) | More stability, slower shot |
The brace height impacts your draw length, because it determines the arrows resting position. For example, a bow with a 30” draw length and a 6” brace height will actually pull an arrow back 24”. Therefore, a higher brace height cuts into the bow’s overall draw length more than a lower brace height does, which impacts the speed.
As always, balance how much speed you actually require with your ability to fire an accurate shot.
Step 9: Choose your cam system
Now let’s get into the machinery: the construction of the cams. The cams are what make the pulley system of the compound bow work. Usually you will find two types of cams:
- Soft cams, which are more circular and have smoother draw cycles.
- Hard cams, which are more elliptical and create higher firing speeds.
Soft cams are easier to shoot for beginners, while hard cams can bring more power for experienced archers.
After this basic division, you have four types of cam systems that you can choose from. These are listed in increasing complexity, which often means increased maintenance needs and speed:
- Single-cam. These bows are the most basic, with one cam and one idling wheel. They are easier to maintain and quieter, but their nocking can be less level.
- Twin cam. These bows have a simple cam on each end and offer good speed, accurate shooting, and higher maintenance.
- Hybrid cams. These bows have a control cam on top with a power cam on the bottom. They have been gaining in popularity thanks to their level nocks, lower maintenance than other dual cam options, and speed.
- Binary cams. These bows are designed for speed, with the two cams “bound” together via control cables. They can require more complicated maintenance and are easy to confuse with hybrid cams.
Depending on how technical you want to get, you may choose the cam system that best supports your other desired metrics. If you’ll be maintaining the bow yourself, then it’s crucial that you understand the details of how your cam system works.
Step 10: Risers
Risers refer to the bow’s handle, which can be offered in different styles. The most popular options are:
- Reflex risers curve away from the bow’s limbs and reduce the brace height, which increases the speed.
- Deflex risers curve alongside the bow’s limbs, which increases the brace height and slows speed while increasing accuracy.
- Straight risers are a middle ground between reflex and deflex risers.
Choose the option that supports your goals and provides the most comfort and accuracy in shooting your bow.
Step 11: Consider overall bow weight
Now we step back to the big picture of the bow itself once more. How heavy is your bow, and how light do you need it to be? If you’ll be carrying it across distances or handling it in treestands, a lighter bow might be more important.
Lighter bows can be noisier if they are not made from quality materials. This can be a major detractor for deer hunters (who are often the ones in treestands!). If you’re able to spend more, lightweight bows made from high-quality materials like carbon fiber can get you the best of both worlds.
Step 12: Final details
Now that you’ve walked through the major factors that make a compound bow what it is, you’re ready for those last few metrics that will help you zero in on the best bow for you.
First, look at the bow’s appearance. A camouflage bow might help conceal a hunter, but you can also choose the print and color pattern that’s going to make you feel like your bow is an extension of who you are! If you don’t need camouflage for a target species with strong eyesight (like turkeys or large game), choose the bow that you’re most drawn to.
Next, you’ll decide if you want a bow that’s bare, ready-to-shoot, or packaged. Basically, you can buy a bare bow that’s just a bow, a ready-to-shoot bow that come with the basic accessories that the manufacturer thinks you’ll need, or a bow package that includes accessories for the bow plus arrows, cases, and more to set you up as an archer. This is a matter of personal preference and whether you want to custom-pick your accessories or get started sooner.
And finally, you’ll of course need to consider the price. There are affordable, high-quality bows on the market, so don’t assume that a low budget means you’ll have to settle! But of course, if you can shell out some extra funds, that will help you get more state-of-the-art materials.
In conclusion…
A compound bow is a complex piece of machinery, which means it’s an important purchasing decision. If you’ve worked through this guide and reflected on your personal preferences, you are in great shape to buy the bow that’s right for you! Remember to weigh your priorities carefully and not get a more difficult bow than you actually need.